Studio Plant Photograpy Tips: Improving Your At-Home Skills
by Peter Rockstroh
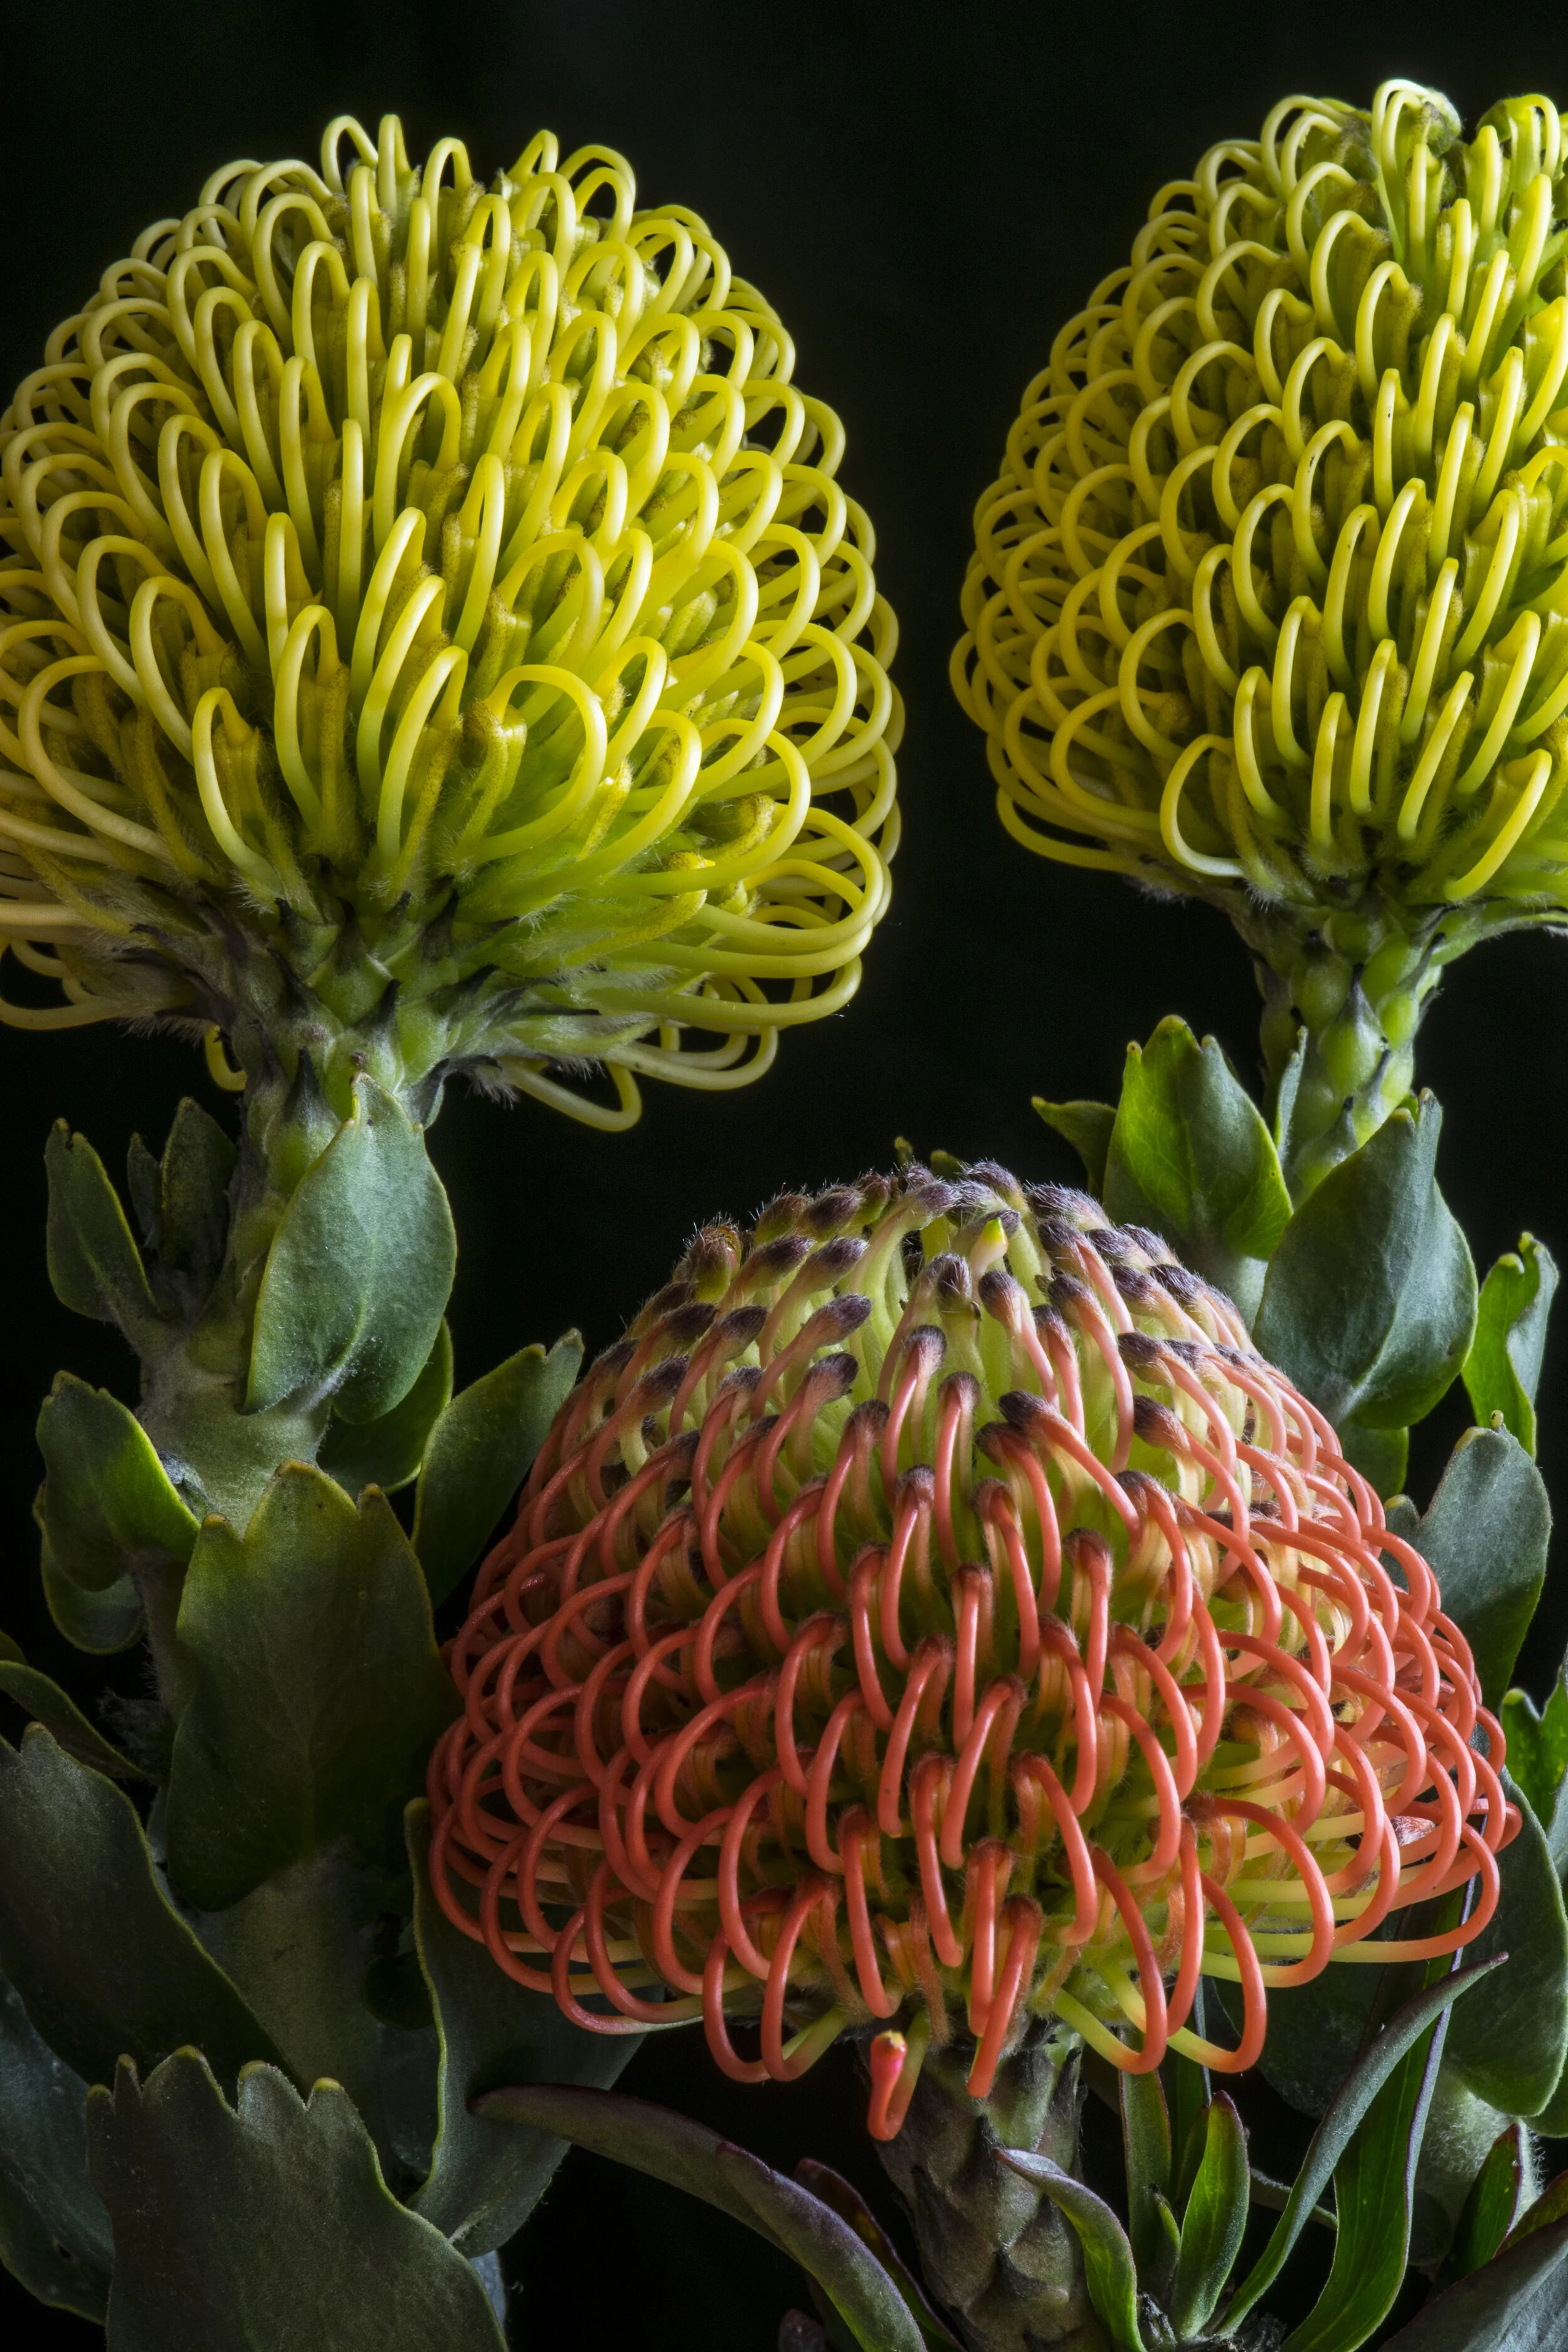
A group of pincushion protea flowerheads (Leucospermum cordifolium cultivars) against a classic black background to heighten dramatic visual impact. Image: ©P. Rockstroh 2020.
Social distancing has – as an understatement - made many previously simple things we did prior to the COVID-19 pandemic very complicated endeavors. Social distancing plus mobility problems for some of us has made a lot of these things even more complicated. After a seemingly minor accident over two years ago I’ve been through several lengthy surgeries trying to repair a busted ankle. Hopefully, next January after another operation I’ll finally be able to walk again.
During the two years I have been partially immobilized by an uncooperative leg and COVID-19 I have learned a lot as it applies to my own experience.
First: All accidents that result in physical injury are stupid. There are, by definition, no brilliantly planned nor fortuitous accidents that end up hurting you.
Second: It makes no sense getting angry that you have an accident that disrupts your life.
Third: Once you learn to never expect too much from your immediate circumstances as a shut-in you will always be pleasantly surprised.
Fourth (but first in order of relevance here): Standout nature photography results are 5% skill, 10% luck and 85% preparation.
So…
I was stuck in my comfortable apartment in Bogotá, Colombia after a lifetime spent out in the wilds of tropical America, not exactly angry or disheartened but growing just a tad desperate.
Meanwhile, there was very little I could do in terms of practicing nature photography. Unable to walk or drive, I had to figure out a way to find some interesting photographic subjects.
Necessity is, indeed, the mother of invention.
Finding myself especially bored one day, I started casually leafing through the Colombian Export Register (yet another depressing example of dentists’ waiting room/pandemic-type literature choices) and, after a few pages, came across the list of cut flower producers.
“Well, now. This could be interesting.”
Colombia is one of the world’s largest flower producers, with dozens of square miles of greenhouses producing immense numbers of flowers I am not particularly fond of. Yes, roses can buy forgiveness after a faux pas and calla lilies have inspired every photographer in the U.S. and Latin America, but I was looking for something I hadn’t taken pictures of before. As I turned the pages, I realized my prayers had been answered.
The advertisement read “Proteas for Export”, and the photo showed a large field with neat rows of pruned twigs and branches. Clean, organized and lacking any obvious sign of what they were growing, the webpage had a telephone number under the tantalizing heading, “Contact Us”.
What the hell? I immediately grabbed my phone and called the manager’s listed number.
After three or four rings, the actual manager picked up, introduced himself and asked in a pleasant tone, “How can I help you?”
No stupid machine, no call waiting, no surly response. Totally nonplussed by my apparent success thus far, I told him I was working on a portfolio of plant images and would like to photograph their proteas.
“Sure”, he answered. “Swing by any time you want.”
For just a moment I thought: “Way too easy, way too fast. It must be a trap. They probably want to kill me.” I told him I’d love to, but the “swinging by” part was not possible until my foot was fixed. I only wanted to know where I could buy some of their proteas to photograph, upon which he replied, “We can’t sell them locally for reasons of bureaucratic mumble-jumble-mumble.”
At this point I was definitely expecting a roadblock to pop up somewhere.
But then, following a perfectly timed, Obama-like pause for dramatic effect he said, “Give me your address and I’ll send you a box of samples.”
It must have been around 6:30 that same evening when a small pick-up truck dropped off a large cardboard box at my home labeled “Fragil”.
After dousing the entire box with alcohol and letting my bomb-sniffing pug give it the once over, I opened the carton to find it had about two dozen gorgeous cut protea flowerheads packaged for export, neatly tied into a dense bouquet that would render any large human unconscious if whacked over the head with it.
The Proteaceae are a family of southern hemisphere plants, of which the famous, exotic-looking flowers (actually inflorescences) are African endemics that range from south of the Limpopo River in Zimbabwe, all the way down to the Cape. These are large, mostly spherical structures that can last over a month as cut flowers, during which they open slowly to display their interesting reproductive structures. Several genera (e.g. Protea and Leucodendron species) are pollinated by Africa’s ecological equivalent to the hummingbirds of the New World, the sunbirds (Nectariniidae). Other well-known members of this plant family are macadamia (Macadamia), famous for their seed and oil, and decorative trees and shrubs, such as Embothrium and Grevillea, the silk oaks.
Admiring my armload of perfectly-finished blooms, I thought about how best to photograph these intricate shapes and decided to use the simplest background and illumination possible to bring out the most of these complex and colorful flowerheads.
Plain vanilla, that is to say with a clean white background.
After many years of trying all sorts of white cardboards and sheets as well as other opaque surfaces, I learned how difficult it is to have a clean white background. There are always seem to be shadow areas behind the subject that have to be dealt with, using other lights, or worse, when photographing something white against white background, calculating exposure can get tricky, and subject and background smudge together into a light gray mess.
I found a practical solution using a large LED ceiling light as background. I use an ultrathin 24” x 24”/60 cm x 60cm LED panel and another one as light source. These panels produce a soft, diffuse and continuous light, and are available in cold (3000°K), warm (8000°K) and daylight (6500°K) versions. I favor the daylight version, which I can use for both, black & white and color images.
The easiest way to create a featureless white background is essentially choosing an overexposed surface without texture. Be it digital sensor or film, this white background should be two or three f-stops more luminous than your whitest white. That ensures a clear tonal differentiation of anything white against the background, and a great edge definition of anything white against white background.
A luminous white background is also a great help to illustrate translucent subjects. In order to avoid a subject silhouetted against overexposed background I use another LED panel to light the front. When lit from the side, the subject looks three dimensional again. Depending on the balance between front and back light, the subject appears more translucent when the backlight illumination dominates, and appears more opaque when the frontal illumination is stronger.
Shown left, inflorescence on the slipper orchid Phragmipedium warscewiczianum in the author’s collection shot as described above.
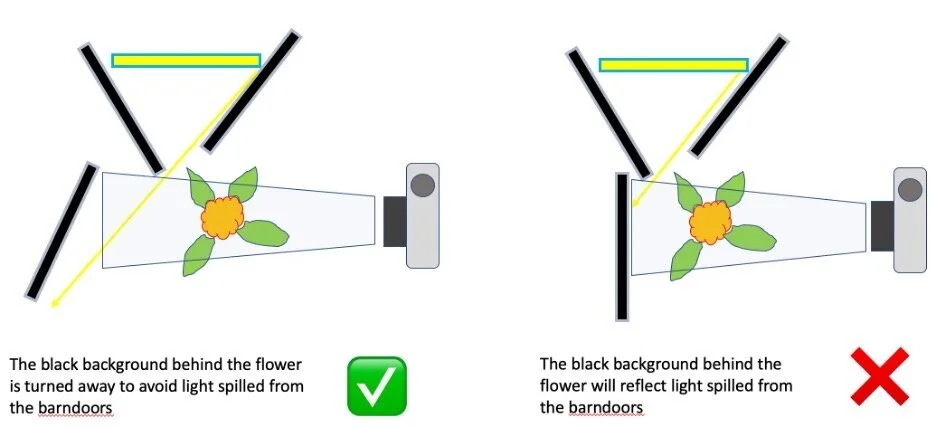
The first illustration shown below depicts the basic lighting set up, with a luminous white background and a lateral panel to balance backlight and front light, and add volume to the subject. The next illustration shows how to use these elements to create the same situation with a black background. It is important to keep in mind that in order to produce black backgrounds, they can’t reflect light.
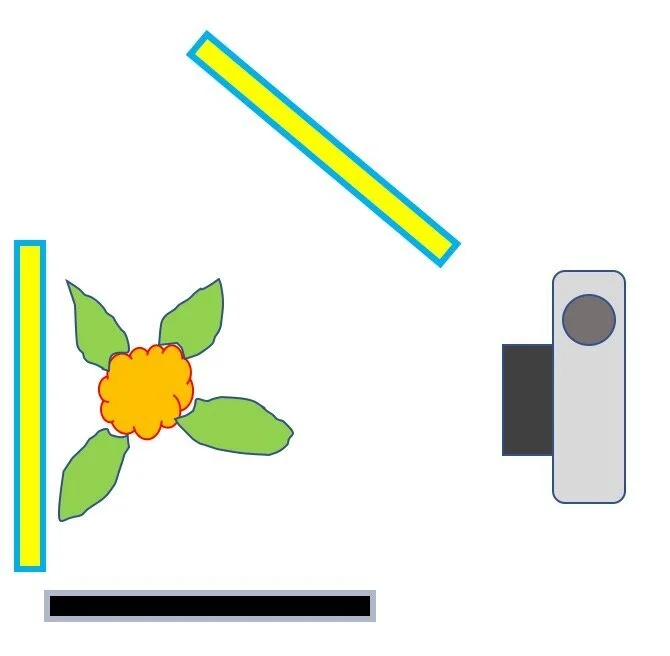
To complement these light sources, I covered the boxes of the LED lamps with black cardboard and use them as barndoors or background. I place them on the edges of the lamp, to create a snoot and use a black background at a >90° angle to the light (see below left), to block stray light from reaching the target object.
These simple elements are useful in creating very clean illustrations of floral subjects, and this setup is also useful for many other themes.
The image of the red gerberas shown right was taken by placing the vase containing the flowers on a LED lamp and using another as a background.
A simple way of determining the initial exposure is using a standard 18% Gray Card. This card is completely opaque and reflects a shade of gray exactly midway between black and white. When you take a reading of the card, it will give you unbiased exposure information, despite the apparent glare surrounding it. Place it on the LED lamp and take a reading of the center of the card.
If you want to show the translucent or transparent qualities of your photographic subject, place it against the LED light background, turn on the second LED light and move it slowly towards your subject and pay attention. As you move the light closer, the subject starts to look more opaque. By using these distance variations, you can graduate how translucent you want it to look. You can also use your flash unit to balance front and backlight. You are balancing how much light is reflected vs. how much light is transmitted to illustrate the opacity or translucent qualities of your subject.
Here a few examples of white background images that produce very satisfying results:

The first images I took with this approach were these Christmas cacti (Schlumbergera). The exposure was measured with a Kodak Gray Card, but this reading yielded a constant +2 f-stop overexposure in digital. With black & white film the Gray Card exposure was dead on the money. The photo that shows flowers and leaves (below), shows them slightly translucent.
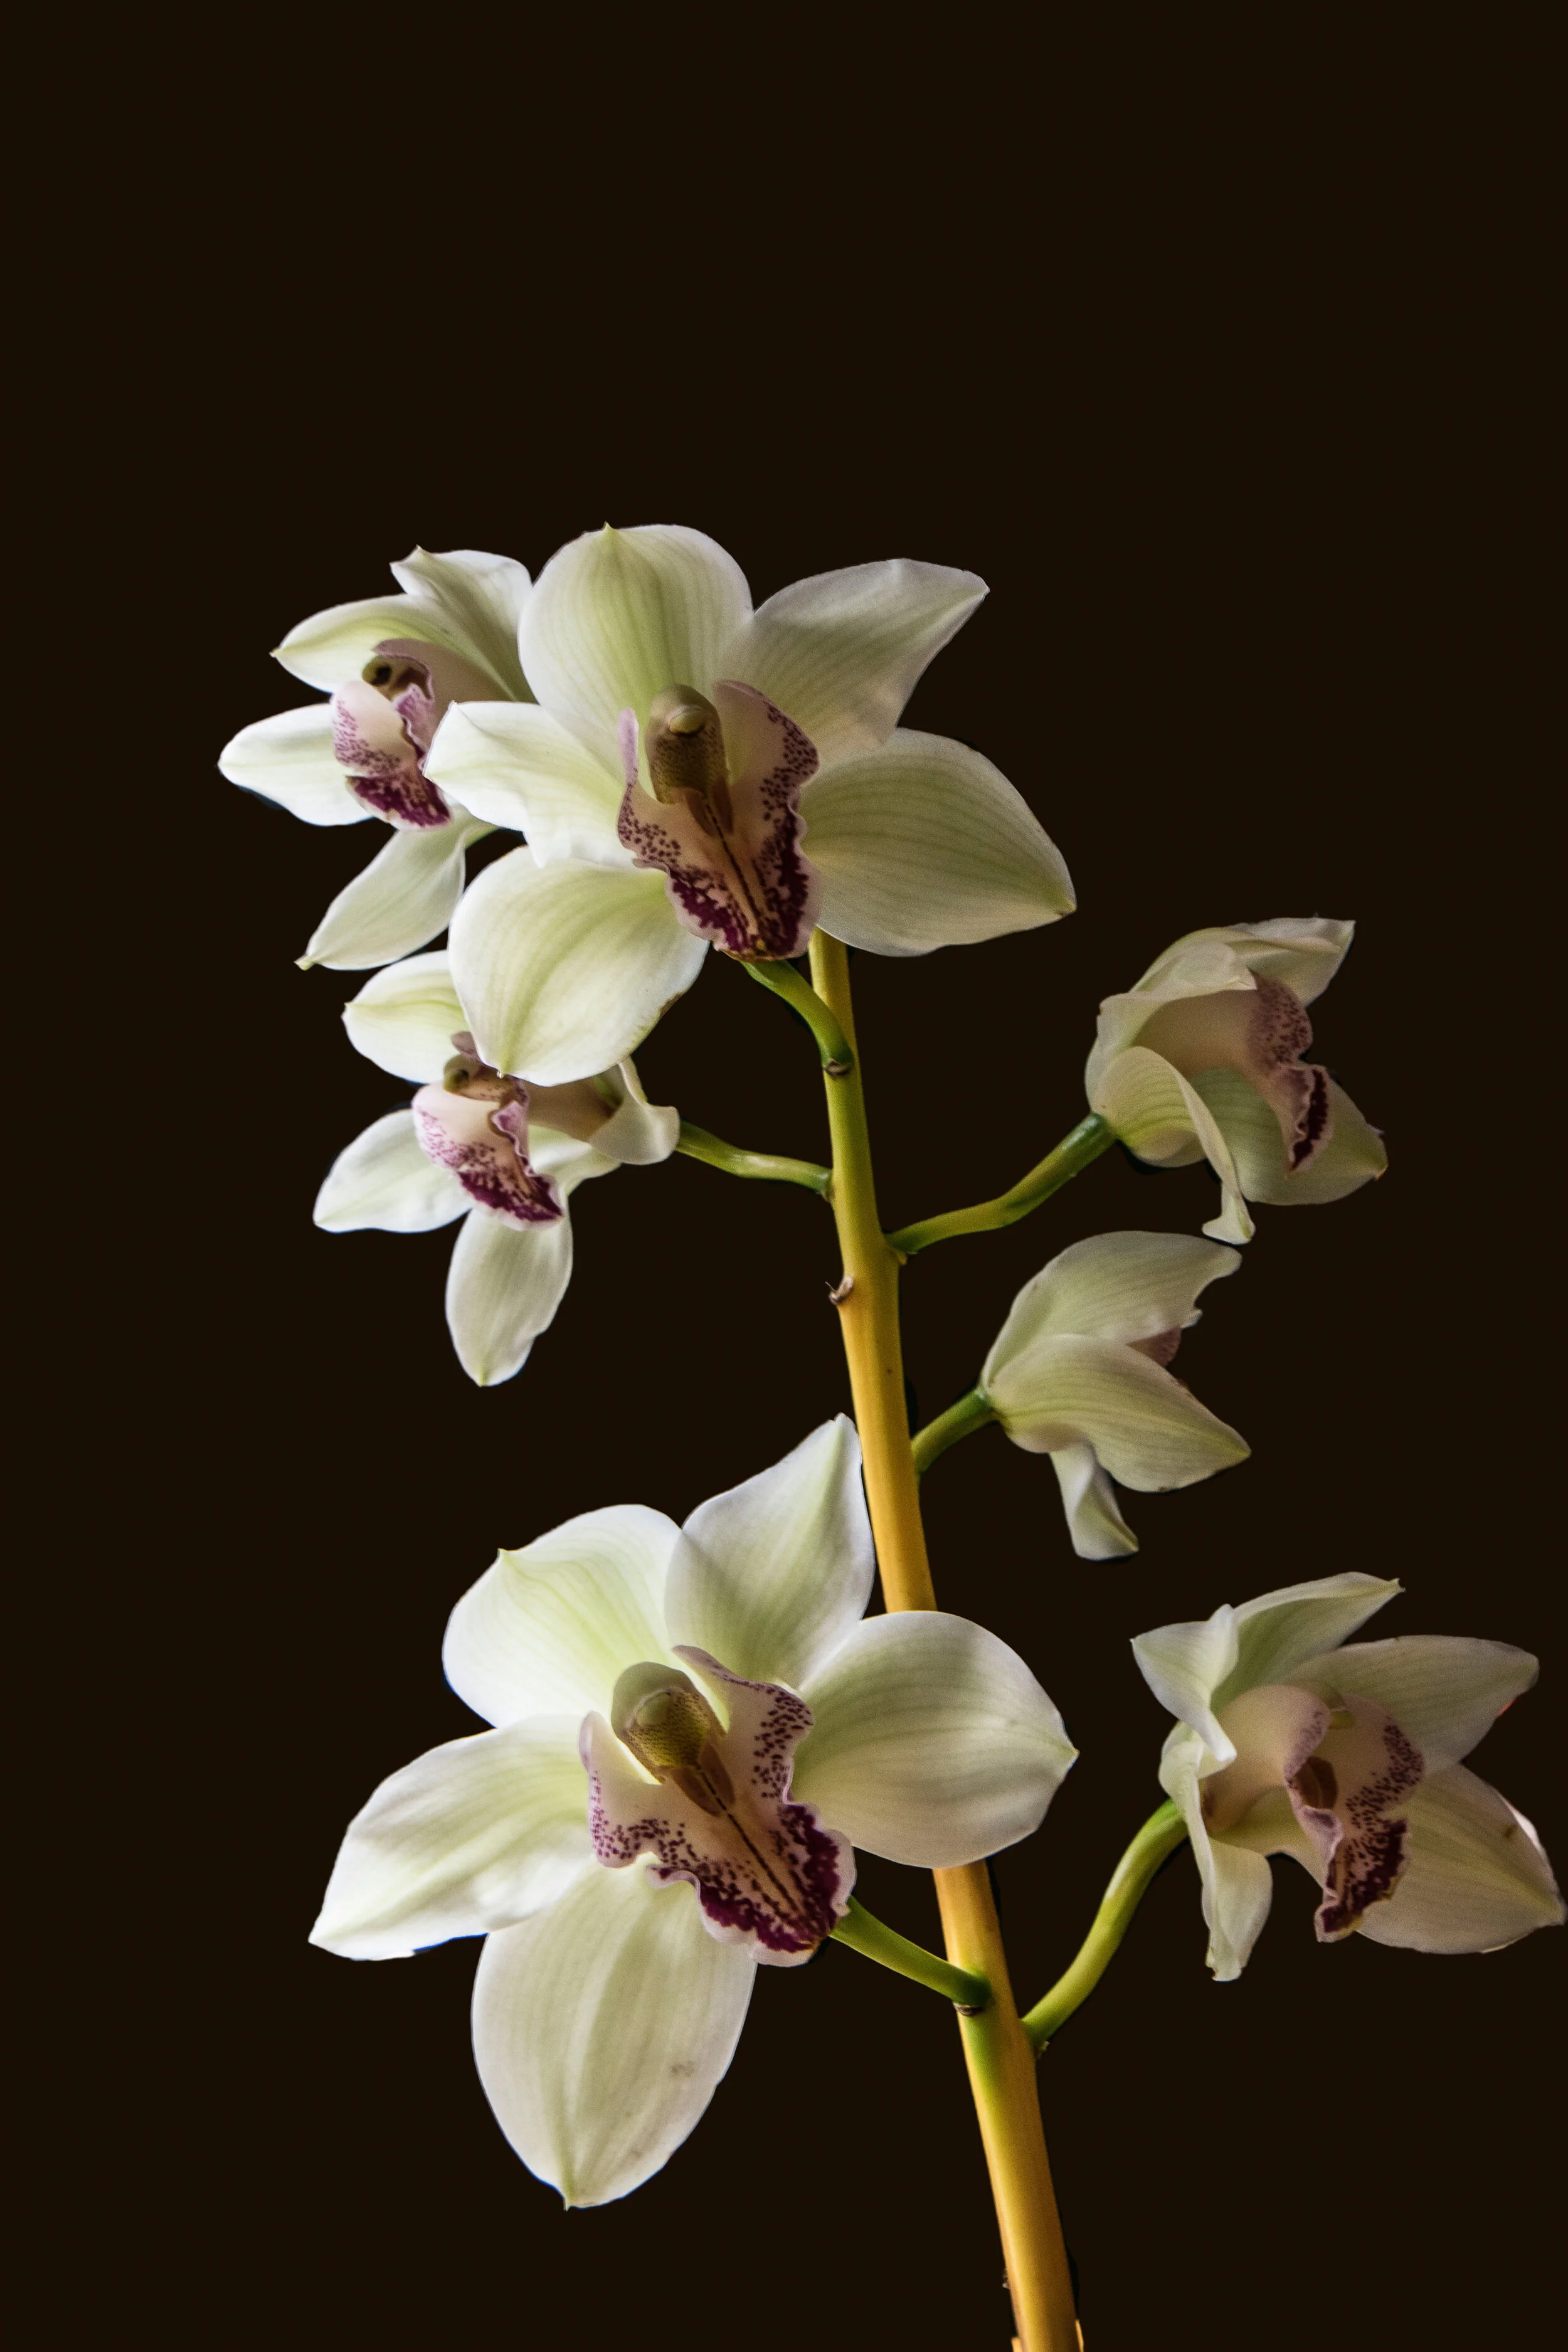
The photo of a single white Cymbidium orchid shows how close you can get balancing white on white with care. This image is the result of several test photos, gradually reducing the power of the on-camera flash until reaching a setting that yielded this result.
The images against black background were all taken after verifying that no stray light hit the background. Most images were taken with a 90 mm macro lens. I used this opportunity to test my 14 mm wide-angle, which has a minimum focusing distance of 12”/30 cm. Notice how sharp the main flower is and how distant the rest of the flowers on the same spike appear, when compared with the 90mm image.
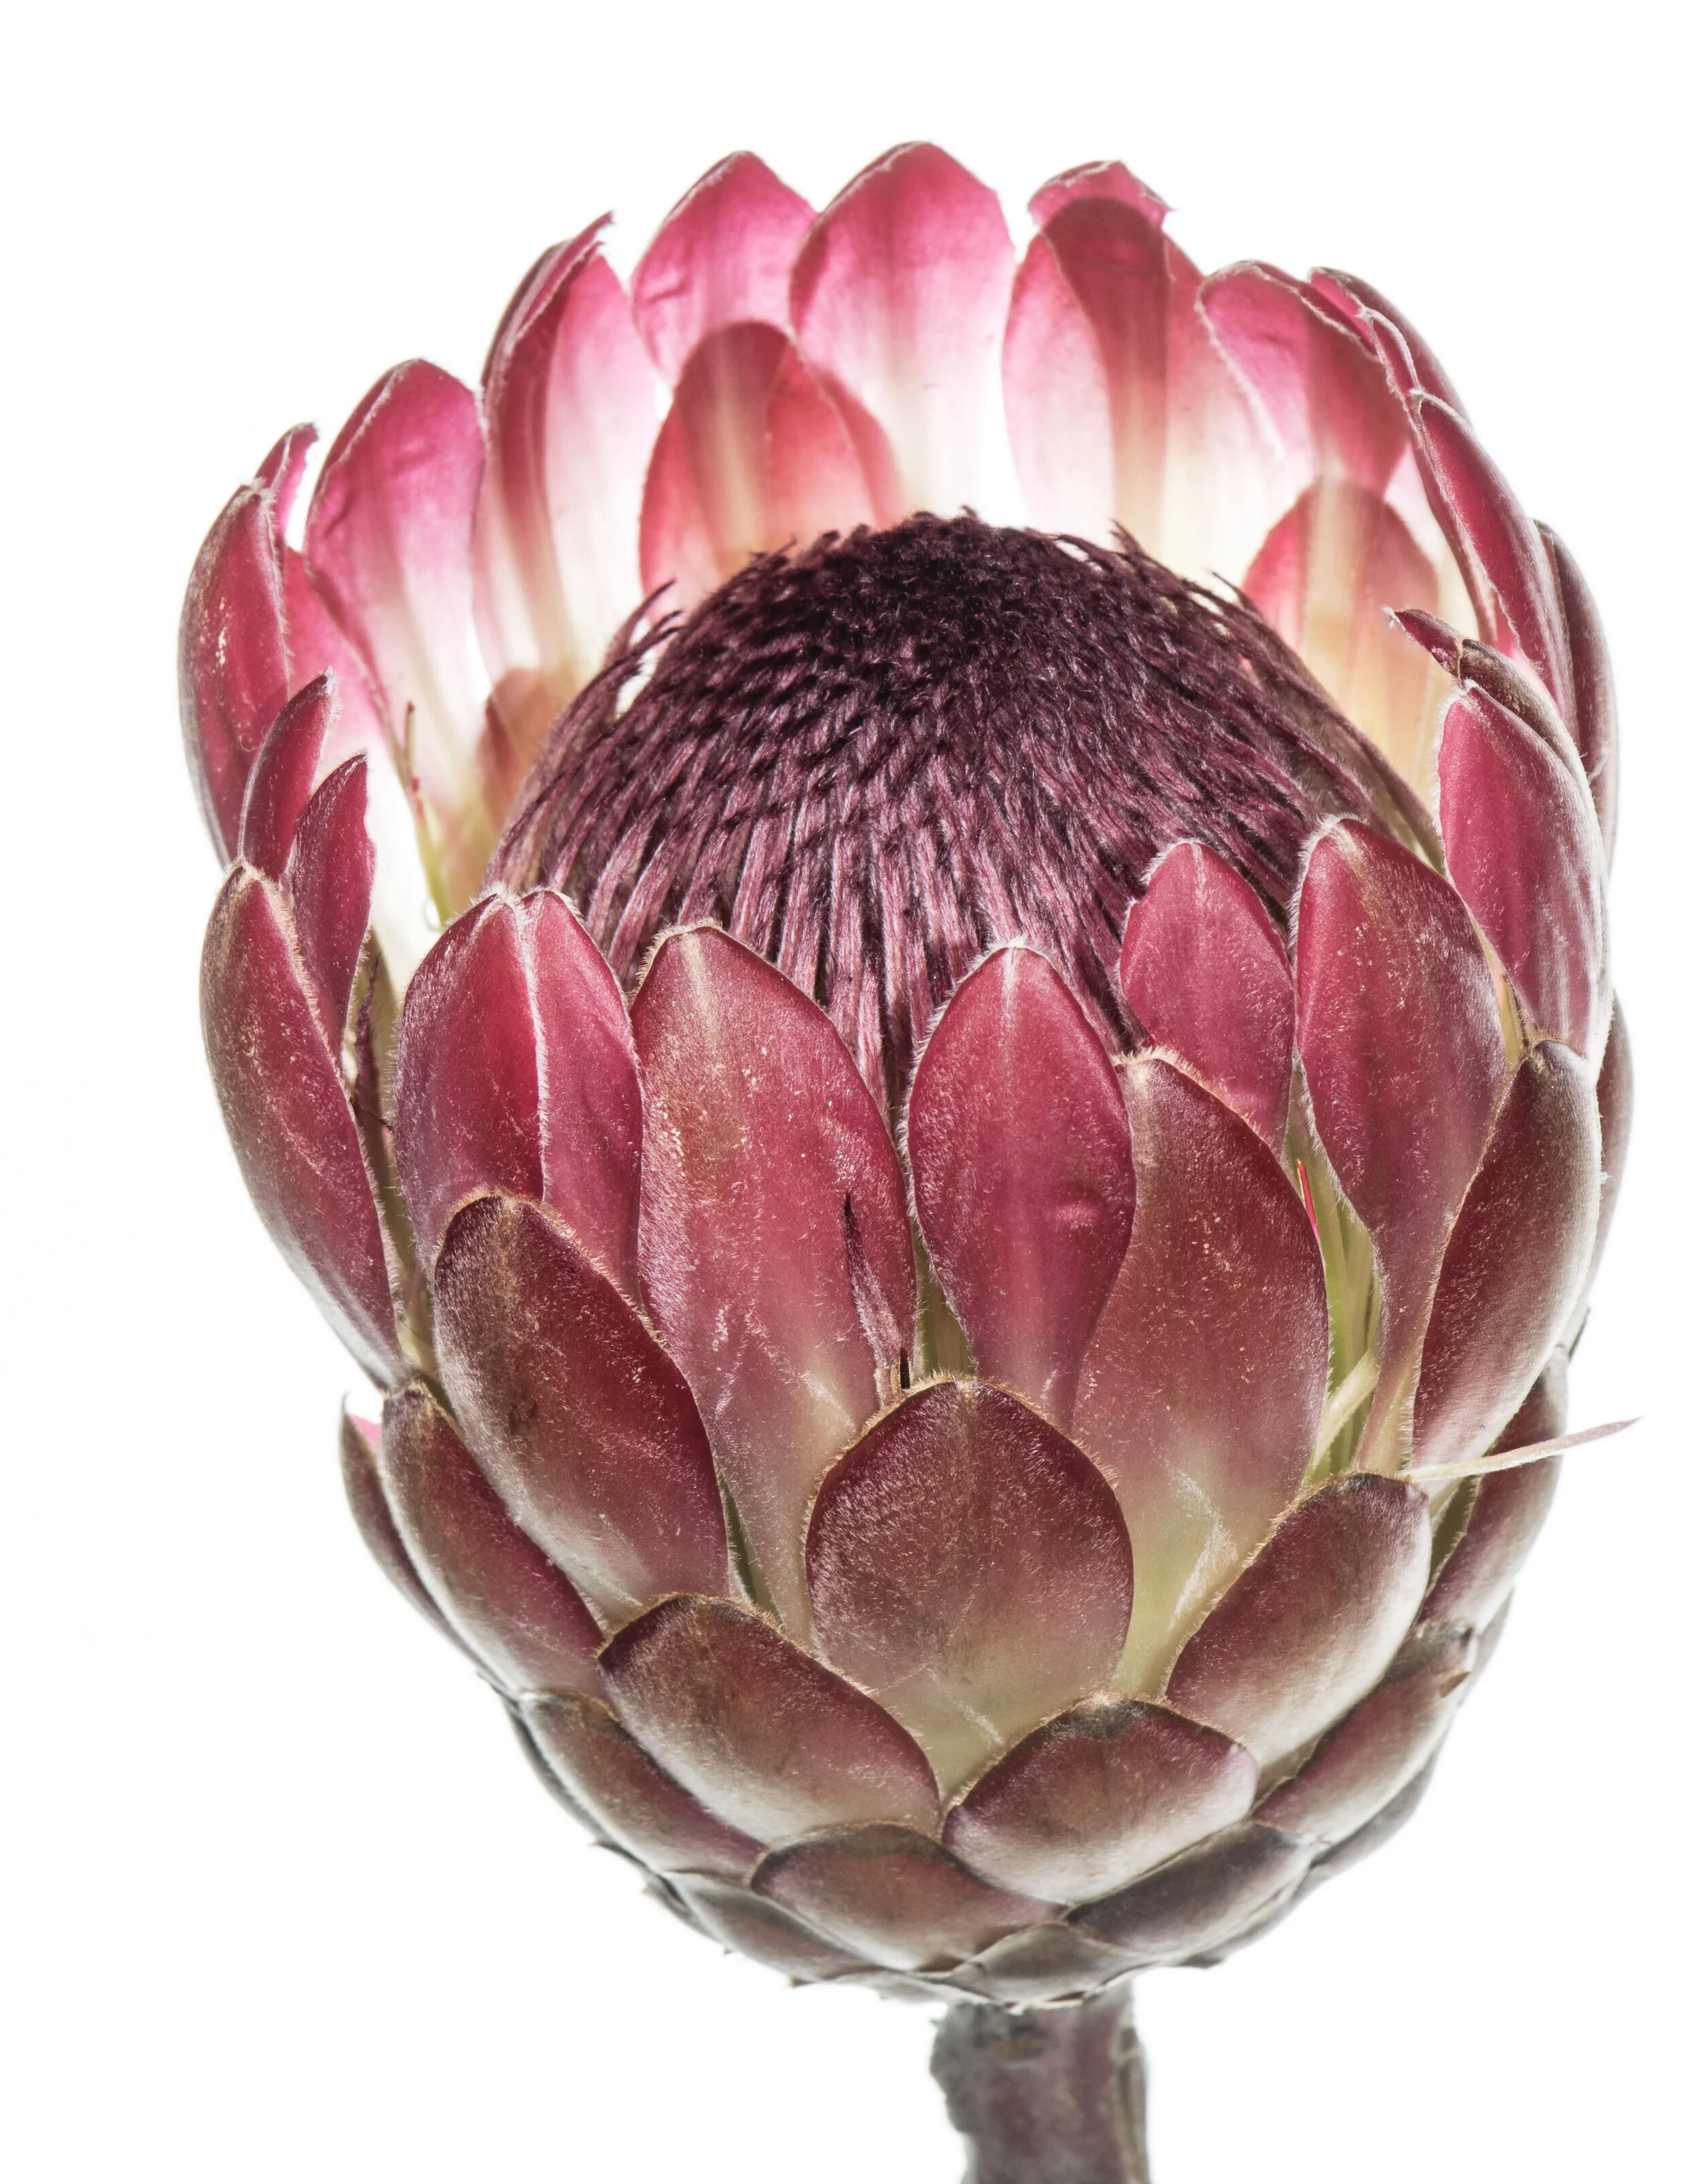
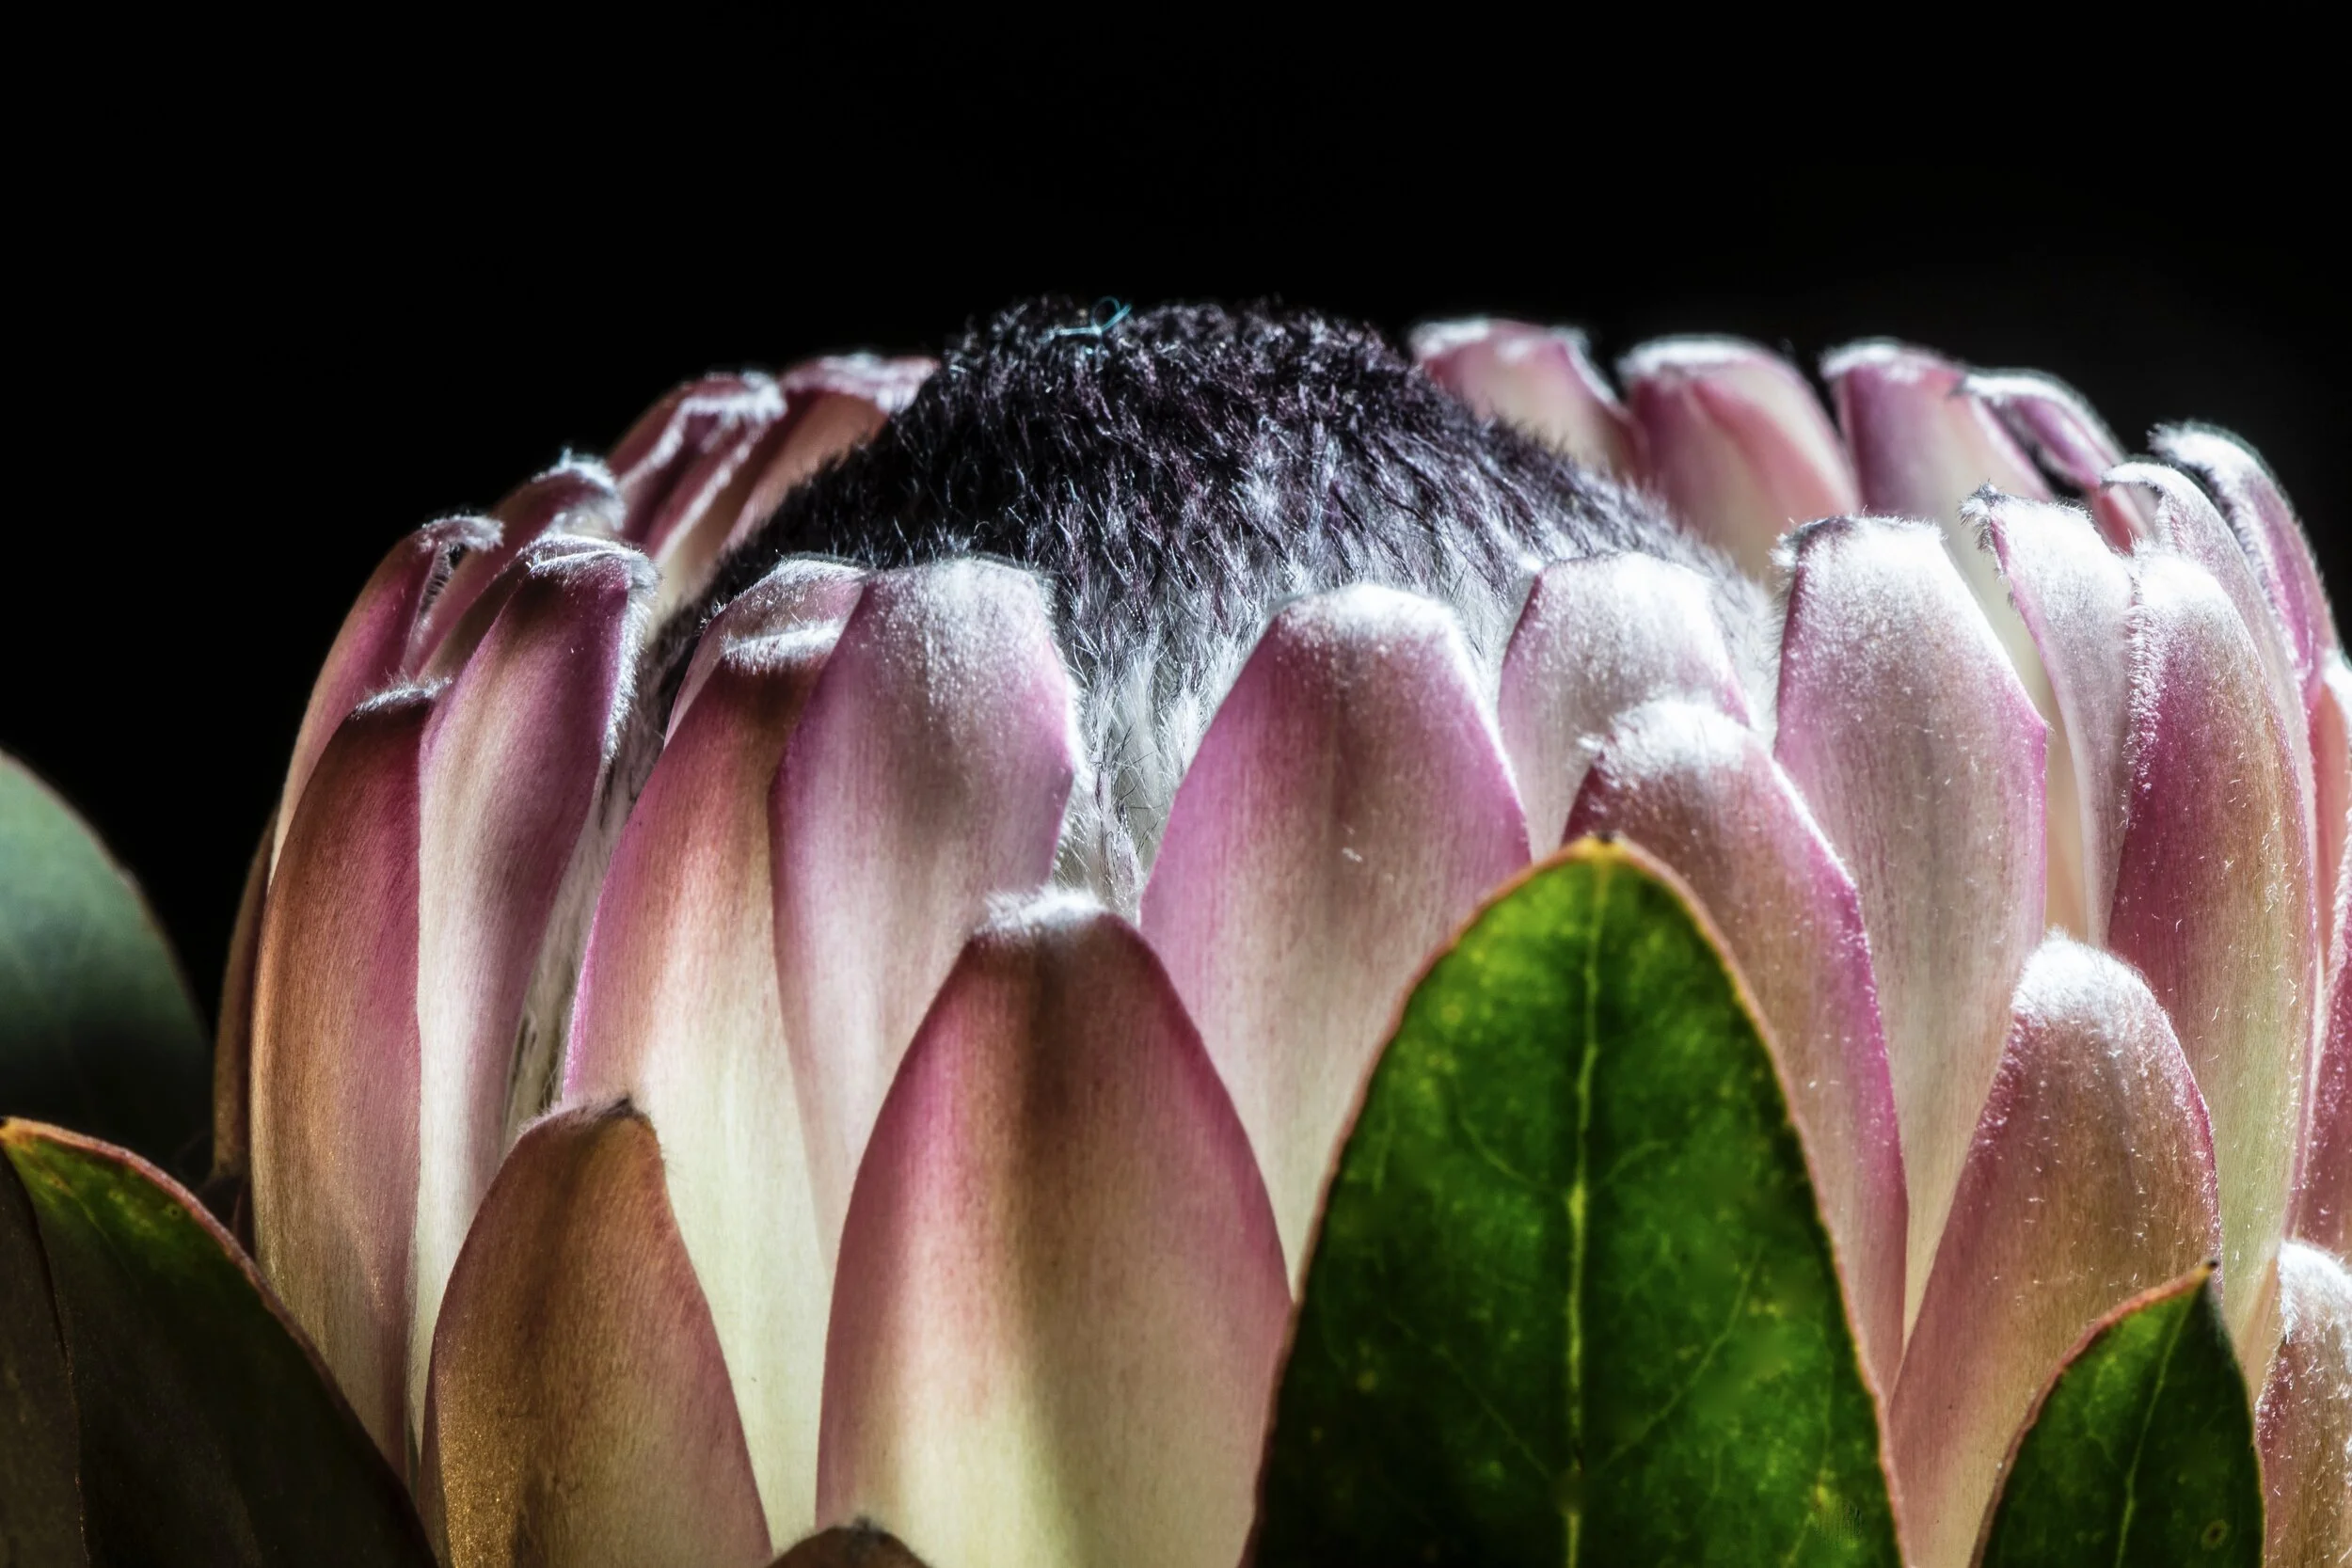
Taking photos with this set-up is relatively simple but produces excellent results for photographers interested in experimenting with floral themes. The time-consuming part consists of paying attention to the effect the light has on the subject. Placing the barndoors (highly professional lingo for piece of black cardboard) in such manner that they barely graze the top of this Protea ‘Pink Ice’, the attractive glow seems to come from within the flower.
It’s worth mentioning that you don’t need to own a top-of-the-line DSLR or expensive point and shoot camera to benefit from the effects of crafted lighting. Very good results can also be produced with the cameras on many smartphones as well as entry level digital cameras.
Invest some time and effort to understand the effect light has on your subjects and how it affects the resulting images. It always pays to examine your subject/s with continuous light at various angle and intensities until you find the sweet spot where the captured image looks best to you.
Good shooting!
A special thanks to Gabriel Quintana, General Manager of Proteas de la Sabana, SAS in Bogotá, Colombia for generously providing some of the company’s outstanding floral material shown above.
All content ©Exotica Esoterica LLC™ and ©Peter Rockstroh 2020.
All content ©Exotica Esoterica LLC® 2020-2025 and ©Peter Rockstroh 2020
Follow us on: